Summer will be here before you know it, and we want to make sure you’re prepared for the coolest weekend at Polar Blast VBS! That’s why we’ve shared this easy step-by-step guide to creating the perfect stage your kiddos are sure to LOVE!
Step 1: Up, Up, and Away!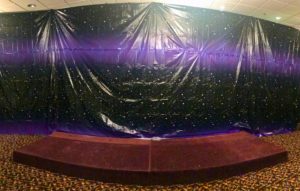
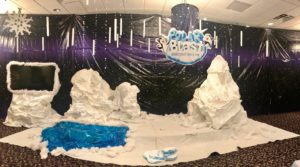
Using pipe & drape, PVC pipes, or your favorite method, hang the Starry Night Plastic Backdrop behind where your main stage will be. To accommodate our ceilings, we’ve tapped two backdrops together for extra height. Adjust as necessary to fit your church’s space.
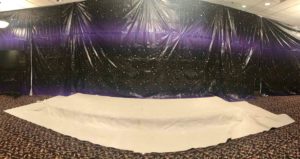 Step 2: Laying the Foundation
For this, you’ll need 2 painter’s tarps, fake snow, and white house paint. Simply lay out the tarp, paint a section, and sprinkle fake snow onto the wet paint. Repeat until the entire tarp is covered. Once that is complete, lay the tarp across the floor of your main stage area.
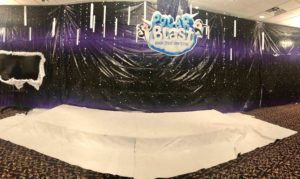 Step 3: Top to Bottom, not Bottom to Top!
Before the stage is covered with additional items, now is the best time to hang your Logo, snow flurries, and Lightcicles from the ceiling. If your church’s ceilings are like ours, magnetic hooks work great! If not, we suggest using plastic ceiling hooks or command hooks.
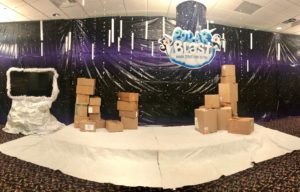 Step 4: Leaning Tower of Boxes
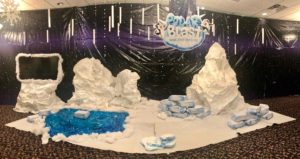
Create iceberg formations using cardboard boxes… think different sized box towers! From there, use packing tape to secure your boxes together, and place these structures on the main stage. Have fun experimenting with different sized boxes and shapes! Your icebergs don’t have to look just like ours.
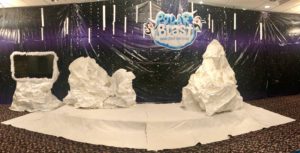 Step 5: Just the Tip of the Iceberg
Once the boxes are placed where you want them, the next step is to cover the. For this, take large pieces of white Kraft or bulletin board paper and crinkle them up—the crinkly-er, the better! Once that’s done, cover the boxes using a staple gun to attach the paper to the boxes. No rhyme or reason, just make sure your boxes are completely covered and the paper is securely attached!
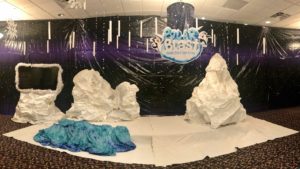 Step 6: Water We Doing Next?
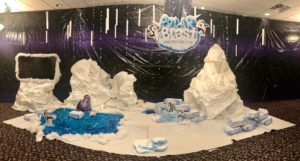
To create the water for our buddy, the walrus, take a single piece of blue Water Fabric and drape it across the corner of the stage as seen below. Be sure to cover a good-sized area with the Water Fabric because after all, the ocean isn’t small!
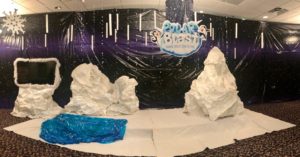 Step 7: Laying the Fin(ice)ing Touches
Next, take blue cellophane and completely cover the Water Fabric. Secure the two together by holding both the cellophane and the Water Fabric in your hand, folding the edges under, and clipping the two together using binder clips– make sure you’ve tucked this under enough so that the binder clips don’t show.
 Step 8: Let it snow, let it snow, let it snow!
To add in extra dimension, rip off small handfuls of Poly Fill Fluff, and place these around the base of your icebergs, pond, and backdrop. Also, now is the time to add your styrofoam ice blocks to the front of the stage!
 Step 9: Brick-by-Brick
We’re almost done! Finish off the last of the snow-y decorations by placing ice bricks throughout the stage. A few here, a few there… whatever looks best for your room and set-up! Use the example we’ve provided below, or have fun placing them where you see fit.
 Step 10: Home Sweet Home
Just one more step! Grab your Polar Blast Buddies and place them throughout your newly created polar wonderland! We promise, they’ll fit right in with their new home and will make your stage complete and ready for the coolest weekend of summer!
2 Comments
-

Fabulous step-by-step doable decorating! Group always makes decorating easy, fun and affordable!
Thanks so much!-
 Author
Hi Dawn, Thanks for your comment. We’re really excited about the Polar Blast stage! It is so easy for any size church, and we can’t wait to see it come to life this summer! Blessings to you.
-